
Anyone who follows the latest trends in front-end technologies probably came across the term “Progressive Web Apps”. It’s not a new concept, but the latest Google I/O conference shed new light on it and gathered extra technologies and libraries which could be helpful to make apps more “progressive”. I want to show you how with just a little effort you could start applying those concepts. This is the first part of the series in which I will present a couple of enhancements you could pick up.
What are progressive web apps?
Alright Man, but “Progressive Web App” what does it mean? I don’t want to give you a long song and dance about the definition or terminology. You could easily find it for example here. Or better, I strongly encourage you to watch a great presentation by Addy Osmani hosted on the latest Google I/O conference. Frankly, that was my motivation to give a more throughout glance into this stuff, and I’m pretty sure that many of you will find it as much interesting as I did. In the nutshell, Progressive Web Apps concept is about making the App more mobile-friendly, almost like a native app (responsiveness, push notifications, device capabilities, splash screens, offline support, etc.).
Splittypie goes progressive
I’ve got a working application which I’ve felt is a great candidate to play with “progressive” concepts. It’s called Splittypie and it is an easy expense split among friends tool. The app is written in Ember.js and source code is available here. It is already mobile-friendly to some extent, it’s responsive, looks like a mobile app on mobile devices, it also has nice mobile-friendly drawer component ;).
Home screen launcher, Splash screen, fullscreen mode
This is a very easy thing to do. Unfortunately, it doesn’t completely work on all major browsers and mobile OSes yet.
Android way
Create manifest.json file, in ember app, put it into /public folder. Manifest file contains some crucial information like app name, display orientation, start_url, icons, splash screen. You could create it manually or search for manifest file generator. I’ve used this one.
You also need to inform the browser in your index.html about manifest file.
<link rel="manifest" href="manifest.json">And here is mine manifest file (for clarity, I omit the rest of icons)
{
  "name": "Splittypie - Split expenses with ease",
  "short_name": "Splittypie",
  "theme_color": "#ffffff",
  "background_color": "#ffffff",
  "display": "standalone",
  "orientation": "portrait",
  "start_url": "/",
  "icons": [
    {
      "src": "assets/icons/icon-72x72.png",
      "sizes": "72x72",
      "type": "image/png"
    },
    {
      "src": "assets/icons/icon-96x96.png",
      "sizes": "96x96",
      "type": "image/png"
    }
    ... omiting the rest of icons
  ]
}
If you are using assets fingerprinting don’t forget to exclude your icons (or hook up manifest.json file into your assets pipeline somehow)
const app = new EmberApp(defaults, {
fingerprint: {
exclude: ["assets/icons/"],
enabled: (env === "production" || env === "staging"),
},
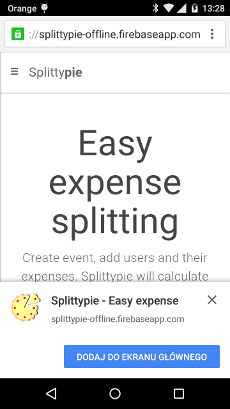
});And now, on your android device using Google Chrome’s function “Add to Home Screen” function you can add a shortcut to your application. Great thing is that not only you have the application with your chosen icon on home screen, but also you have a very basic splash screen and you got rid of the annoying address bar (you can preserve it if you like). Your app looks more like a native one now.
![]()


Here you can find more detailed information.
Web App Install Banners
But, there is a better way to encourage your users to add an application to the home screen. It is a Chrome feature and it’s called “Web App Install Banners”.
There are few requirements to enable this feature like:
- You must have a web app manifest file with short_name, start_url, at least 144x144 image/png icon set,
- you must have a service worker registered, it could be empty
service-worker.jsfile with simple registration as follows
<script>
  navigator.serviceWorker.register("service-worker.js", { scope: "./" })
    .then(function(res) {
      console.log("registered service worker");
    })
    .catch(function(error) {
      console.error("error... ");
      console.error(error);
    });
</script>- your app is served over HTTPS
- the user has visited your site at least twice, with some time between visits (I think that time changed and it’s currently a day).
For testing, you can force the banner to appear by setting the chrome://flags/#bypass-app-banner-engagement-checks flag. Anyway, with this flag enabled, it looks like the banner keeps appearing every time I visit the website.
Note that the above requirements may change over time.
iOS way
Adding an application launcher to the Home Screen is also possible on iOS devices (through Safari of course). In this case, you don’t need to create any manifest files, you only need to add a few links to proper icons and meta tags to the document’s head element.
<link rel="apple-touch-icon" href="assets/icons/ios/icon-60x60.png">
<link rel="apple-touch-icon" sizes="76x76" href="assets/icons/ios/icon-76x76.png">
<link rel="apple-touch-icon" sizes="120x120" href="assets/icons/ios/icon-120x120.png">
<link rel="apple-touch-icon" sizes="152x152" href="assets/icons/ios/icon-152x152.png">

<!-- Unfortunately this doesn't work on iOS9 ugh, wtf apple? -->
<link rel="apple-touch-startup-image" href="assets/icons/ios/startup.png">

<meta name="apple-mobile-web-app-capable" content="yes">
<meta name="apple-mobile-web-app-status-bar-style" content="black">
Just follow the official guidelines.
Conclusions
A Progressive Web App uses modern web capabilities to deliver a native app-like user experience. You can start small and make your app more mobile-friendly today. There are a lot of great articles about Progressive Web Apps out there, you can start with Addy Osmani’s article. I know, I barely scratch the surface in this post. See the next part dedicated to assets caching.